Introduction
When I first started this course, I was excited and looking forward to learning how to rig a character model and animate my character. During the first few lectures, I was given an assignment to animate a character model with a documented portfolio of my journey in this course. I was also advised to follow the style of my character when it comes to animating it. For example, if the character is a muscular man wearing gym clothing, I would animate them doing press ups or lifting a dumbbell.
In this portfolio, I will talk about the ideas and concept creation of my character’s movement, experimenting with other software and their animation features, I will include self recorded videos of references. Then use those references to mark key points for my character model and talk about my experiences with this course from start to finish.
Idea Generation
As a start, I decided to use the character I made for my Character Design course. Then thought of the animation sequences. Before any drafting and idea generating, I looked at the lore I provided with my character, and started generating ideas for the animation of the character.
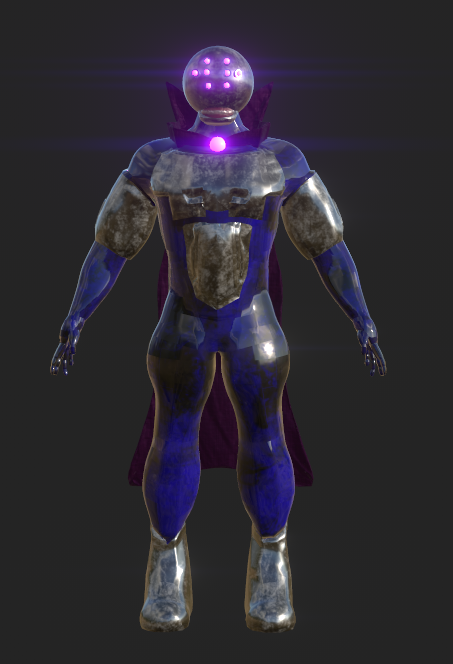
From looking at the model I made, this character looks like an imposing force. A half human, half robotic hybrid with eight spider like eyes, aged metal armour and plating, dark blue tar-like body, a permanent eerie grin and a glowing purple orb that connects to a dark purple cape that used to be his clothing before he transformed into this amalgamation.
The animation sequences for this character needs to resemble it’s style. The lore of the character should impact the decision making of my animation sequences.
In my case, the character is a scientist who believes the technology he holds can modify, change and upgrade life if he integrates it to himself giving him the power to reshape and transform life into something better. Him being obsessed, stole the technology and fled to a rural cabin in the woods where he had a lab set up. He then realised during the escape, he unintentionally damaged the tech.
(This segment of the lore shows that he is not a nice guy as he stole a really powerful piece of tech and is willing to break the law by stealing such equipment)
As he took a closer look, the machine floated off the table a few meters and started to spark, crack and rotate uncontrollably and then halted to a stop. The scientist stared in confusion and suddenly the technology opened up and flew right into the face of the poor scientist completely clamping his head shut in the machine.
(This segment shows that he had made a grave mistake which lead to the character’s horrifying, permanent disfigurement) This gives off an eerie tone with the character.
The scientist tried his best to pry open the tech whilst his face is being burned, scorched and impaled by the mechanical mask he was forced to put on. He screamed in pain and agony while stumbling into his lab equipment. He then collapsed to the floor like a powered down robot slumped on his knees and blacked out.
(This segment shows the desperation and brute force he had to deal and this mirrors to how his personality will shape to be. He is no hero)
As he woke up, he realised is full body from top to bottom has transformed. His skin looked tar-like with a dark blue tone and his arms, legs and upper body became more muscular. His lab coat was ripped had been was altered to look like a dark purple cape.
He rushed out into the nearest lake and looked into the reflection. Feeling an overwhelming sense of anger, fear and regret he held his head and gave a horrifying shriek. He also realised that his voice became more robotic and his shrieks are more alien like.
(This suggests that the character is animalistic as he gave a monstrous roar)
He sat at edge of the river and put his hand on his head. He looked at a pebble picked it up and threw it into the lake. As the pebble flew into the air it glowed purple and hit a moving object in the water. The object stopped moving for a sec then it glowed purple and leaped out of the water. It was a purple glowing barracuda with a metallic jaw and sharp knife-like fins.
The scientist looked at the fish as it leaped and went back into the water and swam away. He took a pause and said to himself… Fascinating!
(This shows that this character may hate that he is disfigured but realises that it was a great price to pay for the power he wields)
The lore alone, can provide a good amount of ideas for the animation of the character as it builds a basic area on what the character is based of. Also I have been searching for videos and character animation styles on different websites.
The videos below shows what type of animation style I’m going for, when animating my character.
We where also advised to create our own recordings of decided movement of our characters. When attending the lectures, I had ideas of what my animations would look like. I was tasked to think of a list of 3 different animation styles that link with my character. The three that I have chosen, was a floating animation (where the character floats up in the air with ease and looks at the camera), an admiring animation (where the character looks at his hands in admiration and looks at the camera), and a realisation animation (where the character realises what he has become due to the accident in the lore).
I recorded my self doing some actions that will help me for reference.
Levitation
Admiration
Realisation
This may look weird and embarrassing but it will help me with what I want to achieve when making my character move.
Practice Process
For practice, I went on Maya and learnt how to rig a mesh and create IK controls for those rigs. This process was simple because the mesh I was rigging was a lamp. The ways to rig something in Maya is set it to rig mode not modelling mode and locate the skeleton tab on the top left near the windows tab and create joints. This is where your able add a skeleton within the model.
IK
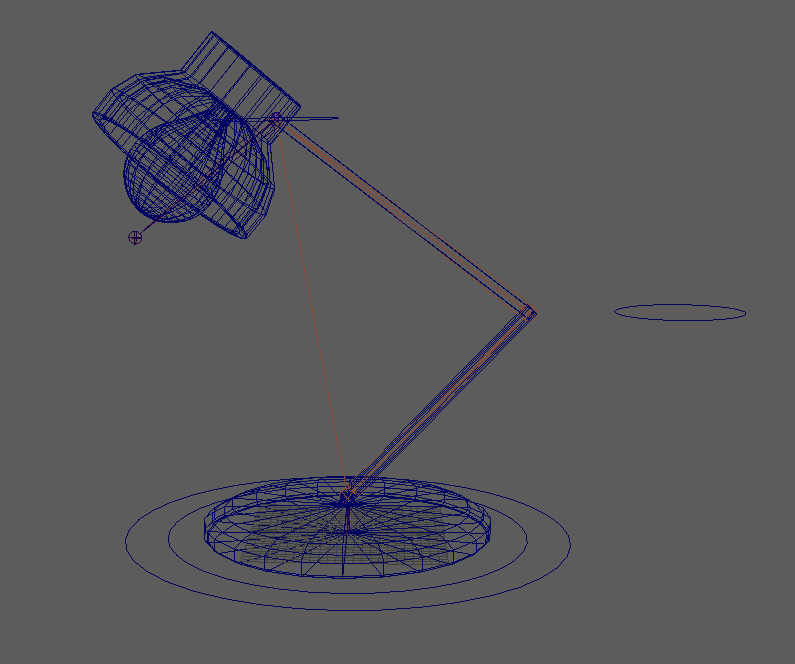
FK
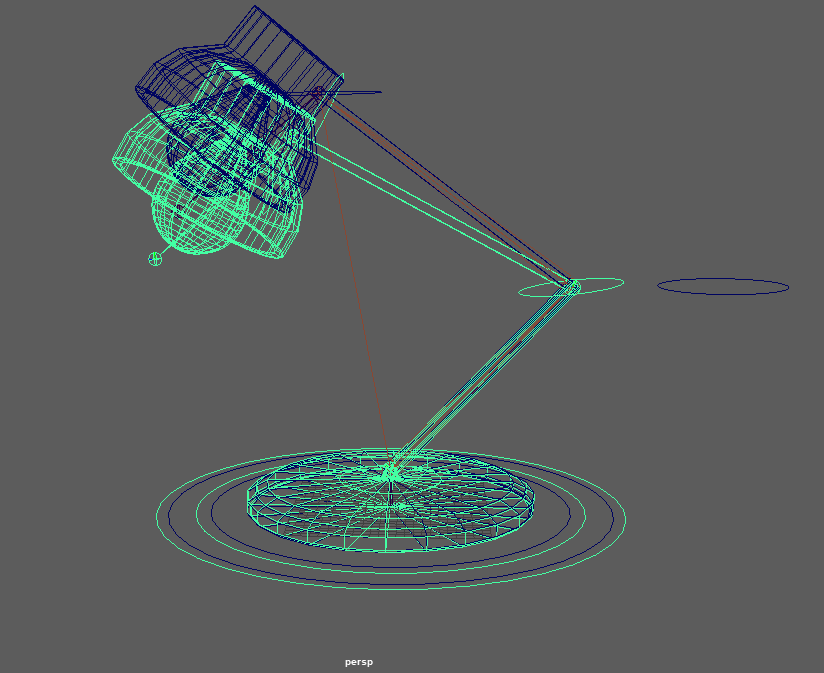
The images above show the IK and FK rigging practices.
Next, I practiced on an full body mesh. this will help me gain a better understanding of how to rig bones on a body model.
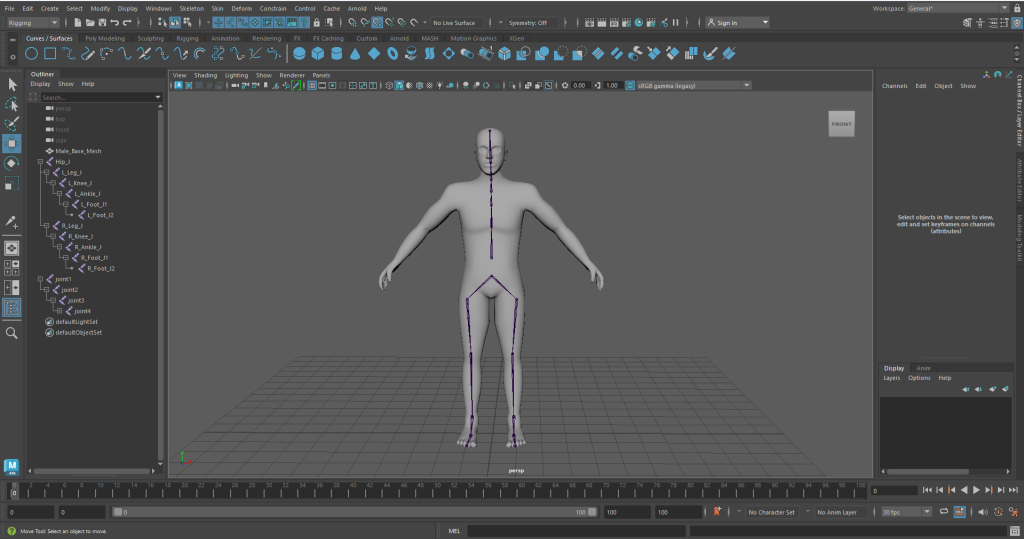
I then learned how to rig arms and fingers.
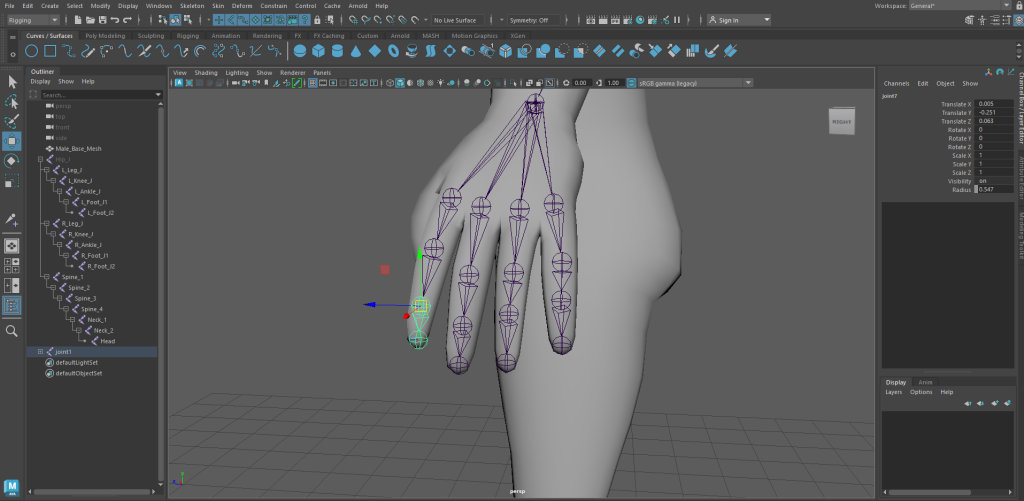
Character Rigging Process
After I understood how to rigg the practice body mesh, I decided to rigg my character model. The tutorials I have followed taught me how to rig and create the skeletal features for my character.
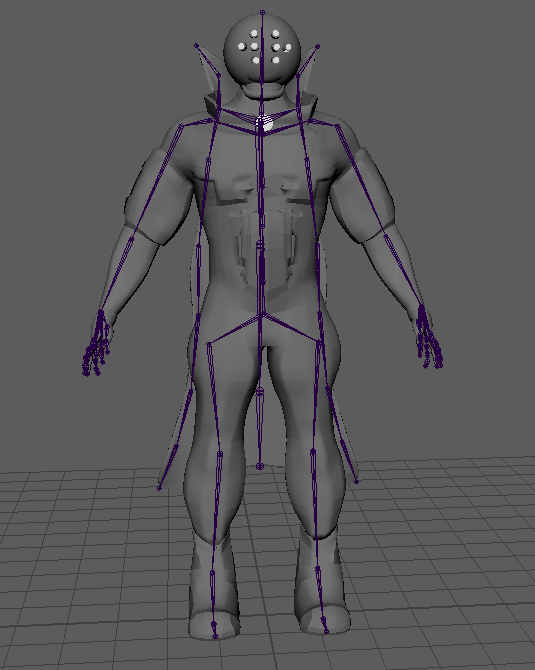
I managed to rigg my character’s feet, ankles, knees, hips, spine, chest, arms, elbow, wrist, hands, fingers, shoulders, neck and cape. This process was easy because I learned how to create the bones. Maya has a few modes and one of those modes include a rigging mode which will allow me to create bones, joints, etc.
Adding CTRLS
Next, I moved on to adding controls to my character’s skeleton joints. This next process taught me how to orient and control the handles for the skeleton movement. I also learned that it is imperative to freeze the transformations to the main controls for both IK and FK controls to keep the default movement as it enables me to easily revert the skeleton back to the default pose.
When I was rigging my character’s IK and FK switch for the arms, I managed to make the IK arm controls work but when I decided to move on to the FK controls and tested their functionality, the skeleton kept breaking when rotating the arms at a certain point and I couldn’t understand why. I’ve spent 2 weeks trying to understand why it wasn’t working (no progress made). I decided to simply just move on and stick to IK controls for my character’s arms and make new pole-vector FK controls for the elbows for more specific elbow movement.
I made controls for the feet and more pole-vector controls for the knees of my character. Since I used IK movement for the legs, I should make pole-vector FK controls for the knees. After I’ve done the legs, knees, arms, elbows and feet, I moved onto the cape.
When making the cape controls, I basically copied the same technique I used to make the arms to be able to control the cape. I did that for the left, middle and right hand sides of the cape.
After I completed the cape, I moved onto the fingers. It took a while but I managed create the orient controls for the each finger joints and managed to make them all work. This part of the course took a lot of time for me to complete as I needed to make sure I get all the controls I needed, to be fully functional.
Skeleton CTRLS
Weight Painting
After I applied the controls for each of the main joints, I moved onto weight painting. Before I did that, I have used the bind skin tool to make my skeleton affect the mesh. Weight painting allows me to control and monitor parts of the mesh that are influencing other completely different parts of my mesh.
For example, when I move my cape, it was heavily influencing my character’s backside, thighs, calves and shoes. The way to fix that is to use Maya’s Vertex Tool, double clicking the cape specific part of the mesh and used flood tool to remove the influence. When moving to the other parts of my body, I wanted to do the weight painting right. This means I spend time doing one body part and move on to the next body part.
I also learned that there is a colour hierarchy that determines the influence of mesh parts when it comes to weight painting. It goes from black (being not influential at all), to red (being heavily influential) and the rest of the colours blue, green, yellow, orange being influential (weakest being blue stronger being orange). There is a white colour in weight painting where it would give a part of a body a hard surface.
This process was straightforward as the task is monitor influences on my character so the mesh would look smooth when moving the joint controls. For my character, he will have some parts of his body look like a hard surface because he has metallic pieces of armour.
I have also learned about a really useful hammer tool. When used simultaneously with the vertex mode in Maya, it helps in smoothing/ normalising almost impossible to reach areas that have their faces contorted and extremely out of proportion. I used this technique when moving my character’s arms, legs and other body parts to extreme positions to fix and smooth all areas so when I move them again the characters body results in a smooth look.
Problems I have faced when weight painting
There was some parts of this process I found to be very annoying when weight painting. This annoying issue, occurs when I remove influence on parts of the body I don’t want. For example, my right arm is affecting the right side of the body. When I remove the influence, that I don’t want, and click off the specific body part I am working on, and click back onto the body part, the weight paints revert back to what it was originally. It basically removes/ destroys my progression.
Weight Paint View SPUP
After sorting out each body part and and tweaking with uneasy polygons, I focussed on fixing some unwanted influences on certain parts of my body that are anything above the blue (the weakest influence while weight painting in Maya). The video below shows all the fully working controls with the fully finalised weight painting. I believe the time I spent with this part of the course was quicker than I expected and I really wanted to spend enough time animating my character.
CTRLS With the Mesh
Animation
Next I went onto doing the animating for my character. When it comes to the animating, there are 12 principles of animation that we can follow in our animated sequences.
The first animation I worked on, was the levitation animation. This animation isn’t the hardest nor the easiest sequence I’ve done but it was a good way to ease into the new things. The overall task is to move different parts of the body and mark them on the timeline below.
The animation required me to make my character levitate off the ground with ease and look at the camera at the end of the animation. I needed to get the basic main movements covered. Examples include the legs, arms, body, head and chest. The animation principles that apply to this sequence include follow-through (for the cape), squash and stretch for the (arms, body and legs), straight ahead (for the some parts of the animation that includes specific arm, finger and feet movement), pose to pose (for the main movements like the arms, legs, body and head) and anticipation (this is when the character bends his knees to and leaps to levitate).
Levitation Block Out
After I have done the main block out of this animation I would need to move onto creating the next animation block out sequence. This sequence is the most difficult sequence in my opinion because it requires me to link and merge movement with two or more completely different body parts.
For example, when my character grasps his head in extreme anxiety and fury, both heads and hands need to move with each other in order to create a head grasping sequence. After this part of the sequence my character then screeches at the camera.
The animation principles included within this sequence are anticipation (for the arms before the screech), straight ahead (for the some parts of the animation that includes specific arm, finger and feet movement), squash and stretch (for the arms during the yell and legs during the anxiety attack) and pose to pose (for the main movements like the arms, legs, body and head).
Realisation Block Out
Then I worked on one of the more easier animated sequences. In terms of animation principles, the most visible ones are stage (character is going to be mainly stationary), straight ahead (for the some parts of the animation that includes specific arm, finger and feet movement) and pose to pose (for the main movements like the arms, legs, body and the head twitches).
This sequence shows my character admiring his new look and as he does, the machine clamped on his head forces him to twitch like a broken robot.
Admiration Block Out
Fully Rendered Animations
After I fine tuned the animated sequences, (making my character move realistically with breathing and slight limb and head movement), I moved onto rendering the animations with the help of Viper. I followed a tutorial guide to successfully animate the character.
For some reason, the textures wasn’t applied when I viewed the links of the animation Viper sent me. So I used a different medium to compensate the failure of applying the texture to the animated render by using Premier Pro’s attribute editor to apply a purple tint to the videos. I truly believe that this was a good call on my end because when I first received the fully rendered animations, they were in a desaturated, grayscale, monotone style and it feels boring to look at.
Admiration
Levitation
Realisation
Conclusion
In conclusion, I have learned a lot about this course and it taught me things I never did before. I had a lot of fun in learning something new with this course and it made me realise my strengths and weaknesses. For example, I struggled with applying certain controls to my character, but I breezed through the weight painting process (mainly due to my character mesh not having multiple layers and my character being pretty simple for weight painting).
The animation part of the course was very fun and I quite enjoyed creating movements for my character. It was a shame that I didn’t manage to apply the character textures to the animation (mainly due to not having enough knowledge of Viper Rendering on Maya). I may have some idea to the reason why this is happening (the file of the textures in Maya may be different to the ones I used for the render because I copied the texture file from another source. And time was running out so I did what I can for the “Character Animation” course).
I did try to rectify this situation by changing the tint of my render videos. I applied a purple tint on the attribute editor of the video in Premier Pro and gave it the purple look. I thought about this change and the possibility that it may dock my grade a bit but remembered that this course judges on the rendered animation of the character not the texture.
There are a few lessons I have learned when doing the animation course. I understood why it’s important to perfect edge loops in Maya (for character design) and having Ngons (edge loops with more than four corners) within the mesh of my character can effect the weight painting process. The negative things that happen includes my mesh showing annoying holes and random triangles sticking out of my character (when looking up close). Saving back ups of each project is vital to keep your work safe and can allow you to back track if you did something wrong that is irreversible.
Reference list
Blizzard (2019) [NOW PLAYABLE] Sigma | Overwatch. www.youtube.com. Available online: https://youtu.be/nWEpjzgMqyU?si=AXYH1wu9U-iXPihl [Accessed 23 Feb. 2024].
BombyWhat, Marvel Comics and Sony Pictures Releasing (2021) Venom Let There Be Carnage All Roar Scenes (Epic) | Venom vs Carnage. www.youtube.com. Available online: https://youtu.be/3-zW8NUeI7c?si=Cg7q4W3pFGNMFNQd [Accessed 29 Feb. 2024].
Lmp, A. (2023) Levitating IDLE. ArtStation. Available online: https://www.artstation.com/artwork/zPz8YL [Accessed 23 Feb. 2024].
Totten, C. (2021) 12 Principles of Animation. GIF. Available online: https://www.gamedeveloper.com/game-platforms/12-principles-for-game-animation [Accessed 7 May 2024].