Categories
Emerging Tech Emerging tech project Portfolio

Emerging Tech Project Blog Post.

Introduction

I was given a task to complete the proposed project for emerging technologies and write up a portfolio blogpost of my whole process from start to finish. I’ll include research I made for the project, any narration aspects, software proficiency related stuff (videos and screenshots and writing about what I learned about the multitude of functionality uses for the software). The portfolio will include ethical considerations. Examples include, lights and effects can attract the user, motion sickness (ways to overcome it). Also talk about what the project will achieve.

I’ll also write about forward thinking (who the project is aimed for, how it can help, future proofing the recording experience so my future self can feel more relaxed when recording my narration when it comes to post production, adding effects to the planets after making their basic shapes.

I will then later add a production piece video and will add references at the end if needed. Most of the references will be mostly the images I will use for the portfolio and some information on these planets.

Immersive Art

What is immersive Art?

Immersive art is a form of creative expression that actively involves and envelops the observer, which can be done either in person or through virtual means. The defining feature of immersive art installations lies in their ability to provide visitors with a meticulously designed, multisensory environment.

Compare 2D with 3D

The main difference is that works of 2D art exist on a flat plane, while works of 3D art are objects. Examples of 2D art are paintings, posters, sketches, comics, illustrations, prints, and photographs. Examples of 3D art are buildings, animations, wood carvings, sculptures, video games and virtual reality.

Advantages and Disadvantages of immersive art

One of the main advantages of immersive art is that it enhances emotional impact. Immersive art has the power to evoke intense emotions and provoke thoughtful introspection. As viewers become enveloped in the art’s environment, they may experience a heightened sense of emotions such as empathy and understanding.

However, that could mean one of the disadvantages of immersive art is that it may overwhelm the user (that technology is becoming more advanced as time grows and can also to lead those not liking this new way of creating art).

What I will be doing for the project

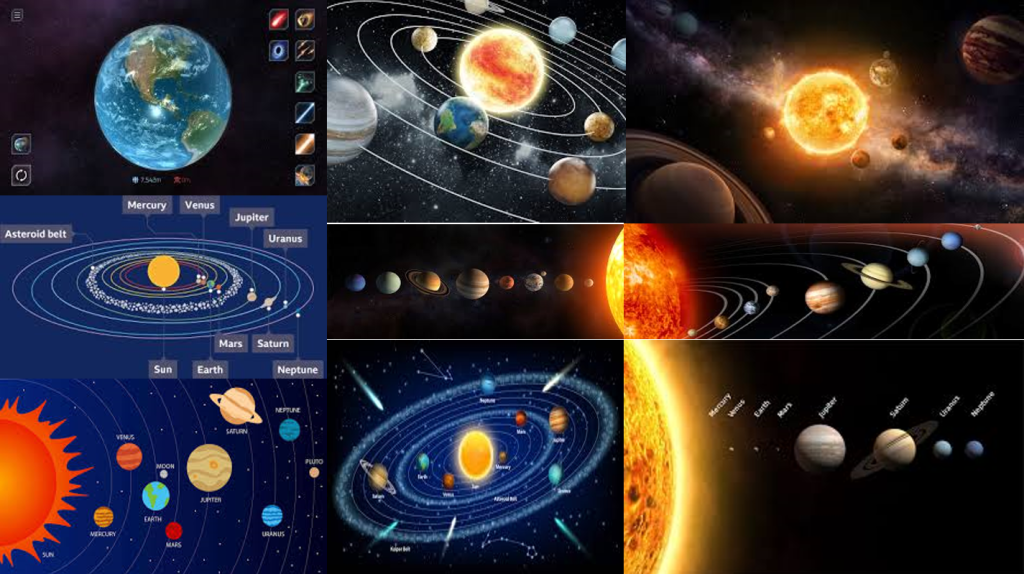
For this project, I will be creating a solar system experience with the many different planets. The experience will include a starting section that trails into the solar system. At first, the solar system would look small in size, but the user can resize themselves and zoom in to see the planets up close.

All eight planets will be created in their proportionately correct sizes on a visual scale and their accurate colour palate. So every now and again I check through multiple sources online to see each planets sizes and compare those sizes to each other and their colours. Technically eye-balling their rough sizes and colour. The solar system Ill create will start with the Sun and end with Neptune.

After I made all the planets, I did plan to record the experience and post the video on YouTube and have narration of what I did for the project and how I did it in the background. I was told however that this doesn’t make it an immersive experience. I had to change my plans a bit which lead me to the idea of incorporating AR technology within the experience.

This means I will need to turn my creations that I made in Open Brush into 3D models (lessening their quality but maintaining and making the experience immersive). Other than the solar system, I plan to make two other objects and implement them in Adobe Areo.

My whole trajectory of the project is me implementing my models in the real world through Adobe Aero’s location anchor setting when making a new project. I’ll then set a location for the project and place the models separately from each other. I will use a borrowed iPad to scan the Q r-code and then walk towards where I placed the models in the real world and record the models being there as part of the interactive experience.

Narration

For the narration, I will be talking about what I did for the project and explain parts of the AR experience. I will talk about where I made the models and how I created them. All the narration will be added during post production using the Premier Pro software. I also talk about what did not go right and explain how I fix those problems. Those problems included the sun being too close to the other planets and the trail would be too big if implemented to life size in the real world.

I have been inspired by our solar system and used it to create it as a project. My narration will include me talking about how I created it in Open Brush is fun and easy to do. Then turn the VR file into a 3D model and place it on the real world using Adobe Aero.

Software Proficiency

Open Brush VR

When exploring through Open Brush, I learned a lot of useful tools I can use to create the immersive experience. Those useful tools include the plethora of different brushes, each having their own textures, style and animations. For example, I can create twinkling stars or create gusty winds with one brush stroke.

I learned that Open Brush doesn’t have ready made models you can just put in and colour them. Instead the software provides basic shape grids that allow you to colour on top of with options to snap the paint tool on the graph when drawing for ease. For example, I have a sphere grid and I point my paint tool on the grid. It snaps on the face and when holding the right trigger to draw, it sticks on to the sphere face as you draw making it easy to draw a 3D shape in a 3D environment.

Also the many small but really helpful tools like the eraser tool, the undo and redo tool, colour wheel tool, select tool, the ability to move object around, to fly or teleport around the art piece, the ability to resize your self and to get closer to objects in the open brush file, the ability to save and lots more.

All the videos I have made, where recorded my entire process of making the VR art with the use of the functionalities of the headset. Also I have taken a lot of screenshots of the outcomes of each of the individual times I have worked. So I helped my future self by recording the evidence I accumulated, and use them in this blog post.

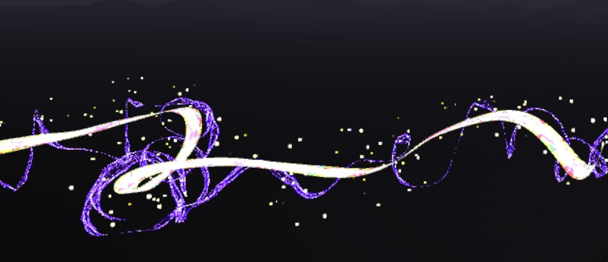
I have opened Open Brush and started working on the project. I was exploring and experimenting with the many brush strokes and tools of this software. I set up the scenery (it being dark and mysterious). Firstly I created a trail that leads to the solar system. I picked specific brush strokes. The strokes I used resembles that of Rainbow Road in Mario Kart Wii.

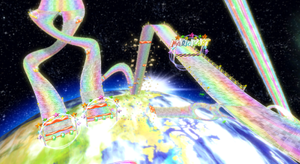
I wanted the experience to look mystical as well as factual. Since I planned to just record the art that I did as a video, It would look really cool as it has it’s effects. I used brushes that light up, zap, create stars, have prismatic colours and effects.

VR Project Ep1

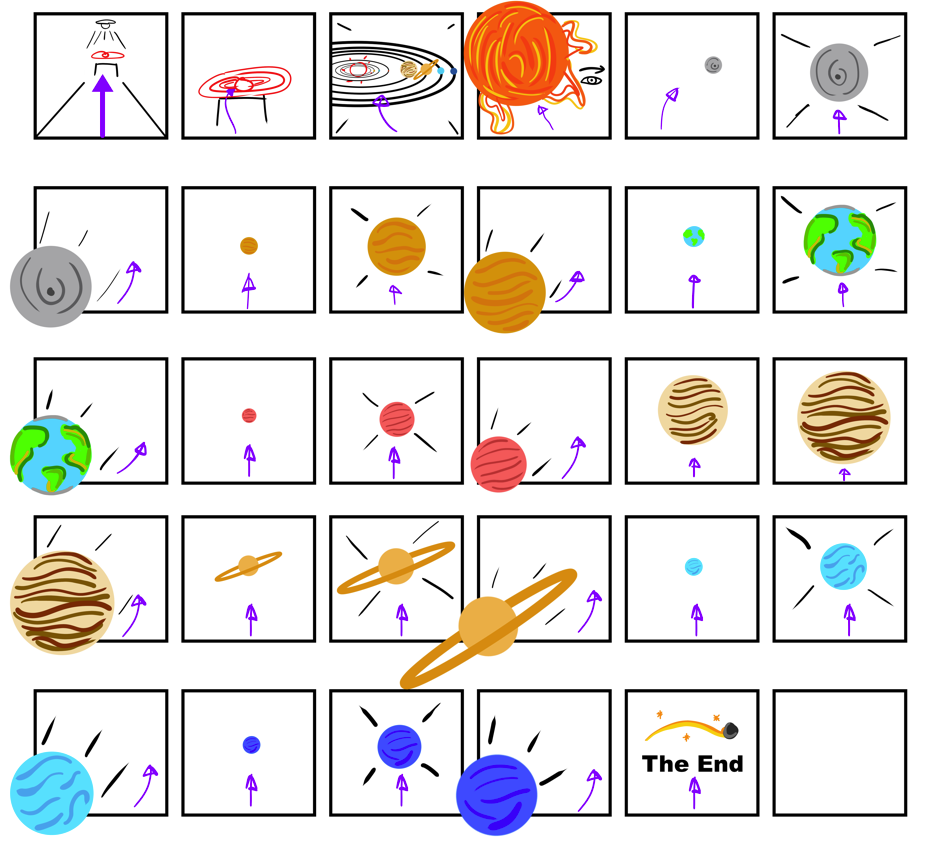
The video below shows the first few moments of me creating the experience in the VR software Open Brush. It shows me creating each of the planets, stars and other space related stuff. I found out within the software that it didn’t have a torus shape model or grid so I had to implement one that I made on a 3D model software. The torus shape allows me to map out and understand where planets go on the orbit, providing me with guidance to create hand drawn rings and an overall placeholder for the art and will be removed once the art is done.

When doing each of the planets Sun, Mercury, Venus and Earth, I focussed on making each of those planets look unique and special. For example, for the Sun, I used a fire brush tool with the colour picked being orange, a charcoal brush with a dark red to mix with the sun’s colours. For Mercury, I chose a marble like brush with the dark grey colour picked and the charcoal brush with the black colour picked.

For Venus, I chose a smooth brush with the colour being gold and a fuzzy brush to add texture to the planet with the colour being dark gold to match. And finally for Earth, I chose a wet brush and chose a light blue colour to create the water for the planet, a smooth brush with a vibrant green for the land, the same brush with a dark green for the greenery variety, and a dry brush with light yellow colour to represent the dry parts of Earth.

VR Project Ep2

When creating the planets Mars, Jupiter, Saturn, Uranus and Neptune, I focussed again on making each of the planets unique with each other. Again using different brushes and changing styles when creating each planet. For example, Jupiter as a gas giant would need to look windy but from a distance a solid. So what I did to create the planet is choose the brush stroke that fits, preferably with wind-like texture. Next, I chose colours that match with our real-life Jupiter and painted ring like patterns up the sphere grid creating the wind like texture Jupiter has.

When creating Saturn, I used a smooth brush with a yellow colour pallet to create the spherical object using the sphere grid. I then used a new technique that I haven’t used for any of the previous planets (and unfortunately forgot to record beyond that point). What I did was I used a wind texture with colours light yellow and dark brown and did the same Jupiter (creating ringed patterns around the planets) but since I used an animated wind texture, the planet will looked animated with swirling winds going around it. After that, I have added the torus model and used it to draw the ring around Saturn with the wind brush (this took some time as it wasn’t a grid I can snap with my brush tool as I am just painting on top of the model with my shaky hand.

Uranus was made using a cyan colour with the wet paint brush tool similar to when I made earth. I used the torus model again to help me visualise where to draw the ring. Uranus’ ring is vertical not horizontal it’s a lot thinner than Saturn’s and it’s white. For Neptune I used the wet brush stroke again. Unlike Uranus, It’s colour is more of a dark blue.

Since I made the mistake of forgetting to record the times when I finished Saturn and it’s ring, Uranus and it’s ring and Neptune, I have recorded a final bit at the end of the video bellow showing all the planets I made and the changes I have done.

Some of those changes include removing the trail mainly because I will not work well in a AR environment due to size changes and convenience. So I replaced the trail with two comets zooming on the outskirts of the solar system.

Other VR art I did for the AR experience

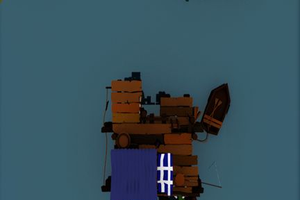
I have used the headset functions to record and take screenshots of my entire process of making the VR art. From creating previous artworks using the VR software, I have learned a lot and understand most of the tools included. Since my trajectory for the project had changed slightly, I decided to work on creating two other VR art that will turn into models. A satellite and a UFO alien space ship.

Satellite

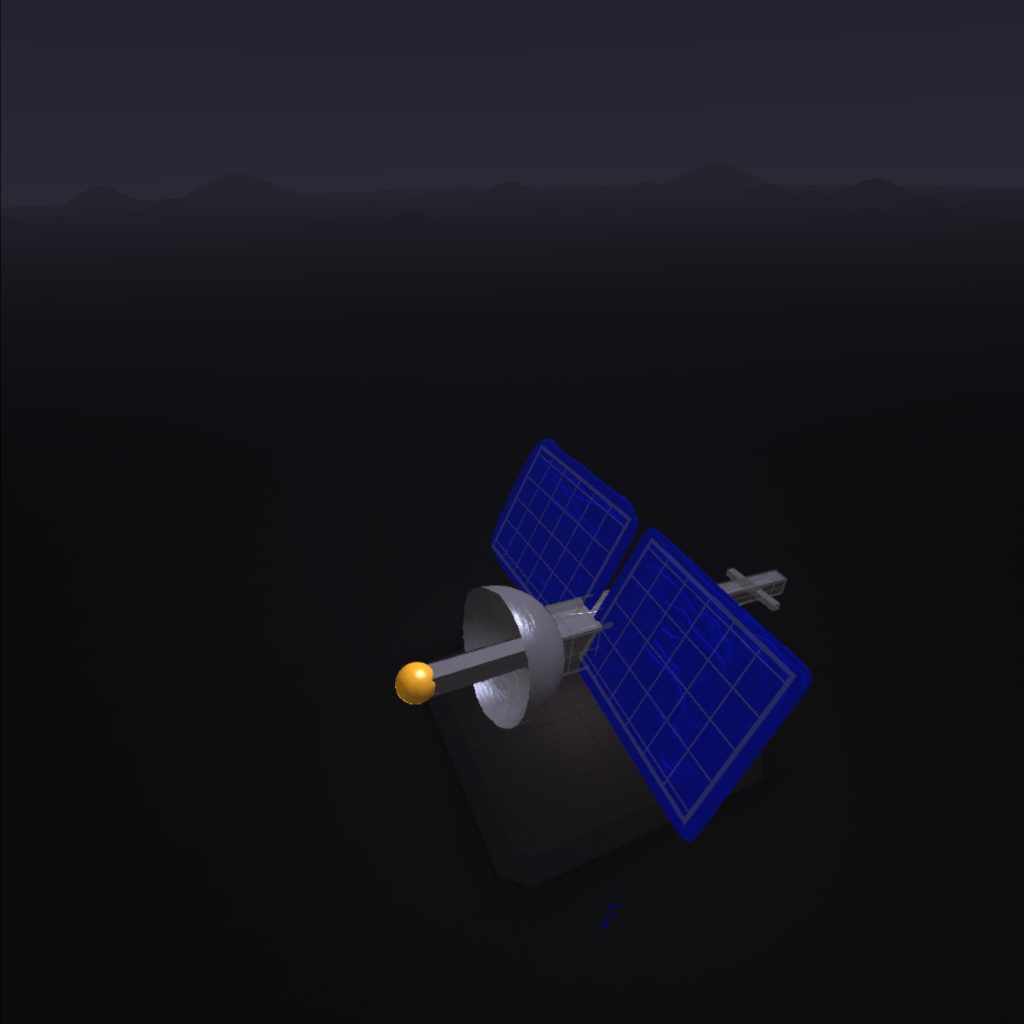
For the satellite, I used a wet paint brush and used the grey colour to create a metallic texture for most of the satellite model. The main way I created the shape of the satellite is the use of grids. Grids help me snap my brush tools to the surface of the shapes to easily create clean shapes with few struggles. I used two sphere grids. One for the dish that points towards the solar system. The other the gold antenna. I used six different cuboids to create the main body of the satellite and the tail and stuck with the metallic grey I chose for the dish. Finally, for solar panels, I used plane grids and with the royal blue colour with the brush being a wet paint texture.

UFO

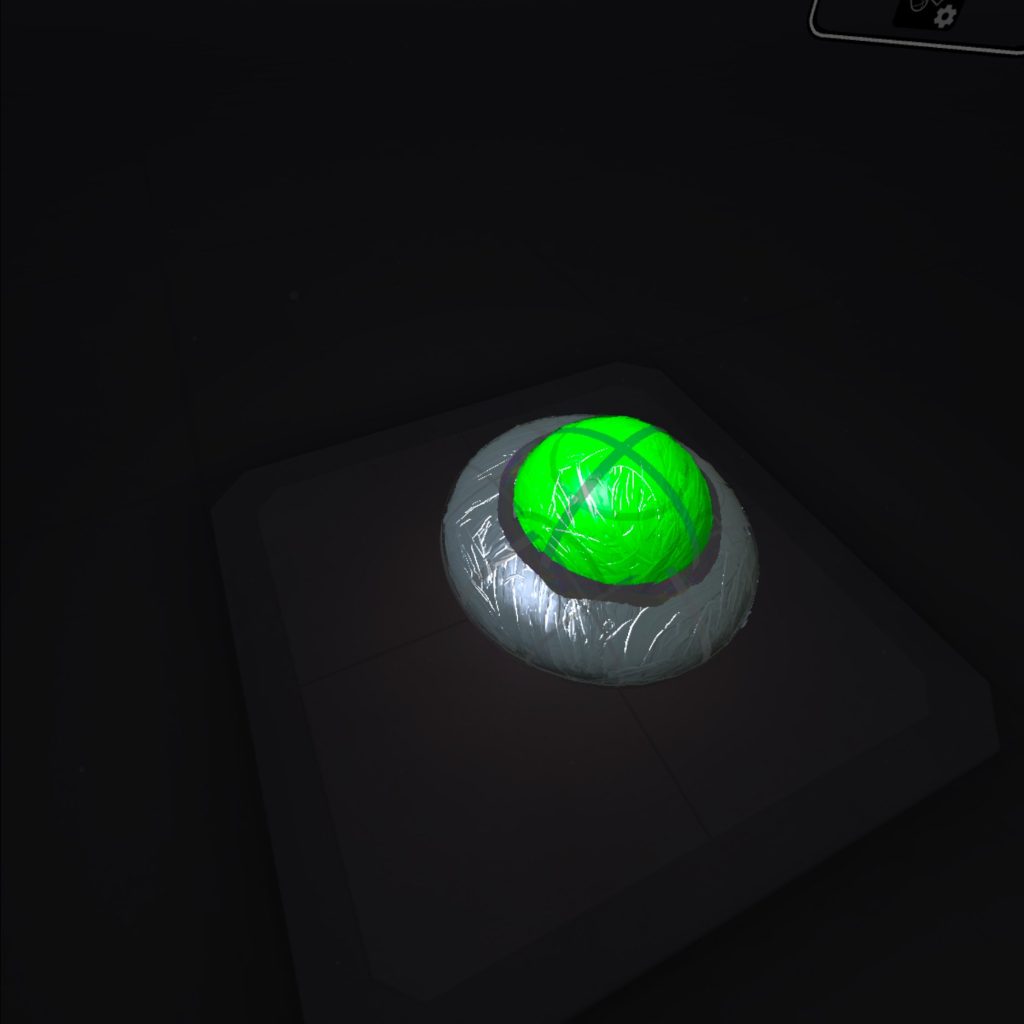
For the UFO, I used a wet brush tool again for both the base of the metallic parts of the alien space ship (using the grey colour) and the green glass dome of the ship (using the lime green colour). I used the software’s grid tool to create the shapes using paint brushes. I did think of adding some brush effects that goes around the alien spaceship. Those effects include, plasma brushes. After I tried applying the brushes I didn’t think it looked well so I just went with the UFO object. I did try to add some shading on the dome part of the UFO and the side. It genuinely looked better.

UFO and Satellite making

Adobe Aero

This segment of the practical project was mainly trial and error. It gave me around 8 different tries to get it right with different ways I tried to record the AR experience and successfully scan the scene. So I’ll explain how the process went and finally get to the solution.

Before I placed the models into Adobe Aero, I had to export the files into folders and zip those folders up for transport. I used Microsoft Teams to send the files to myself and import the glb files with the folder and put them in Adobe Aero.

Within the software, it gave me the option to either go for Image Anchor, Location Anchor or Surface Anchor. I did plan to choose image anchor but it didn’t work due lighting problems and since Adobe Aero was at it’s beta version, the software itself isn’t that advanced.

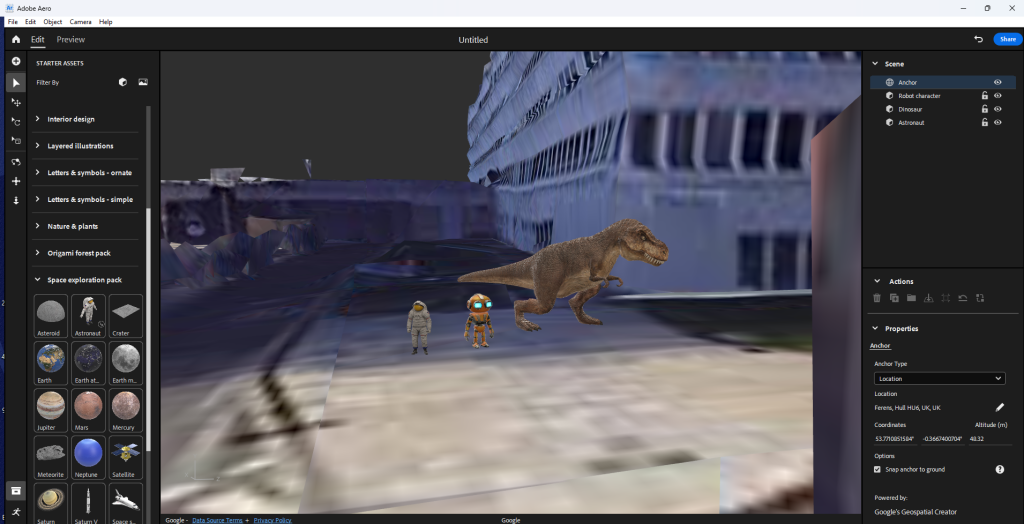
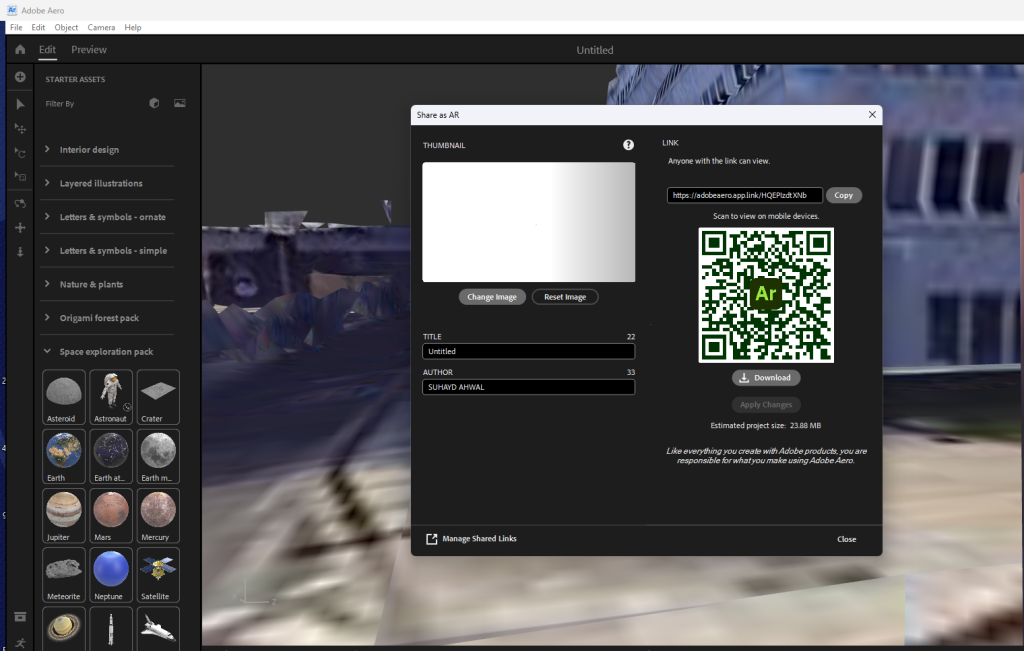
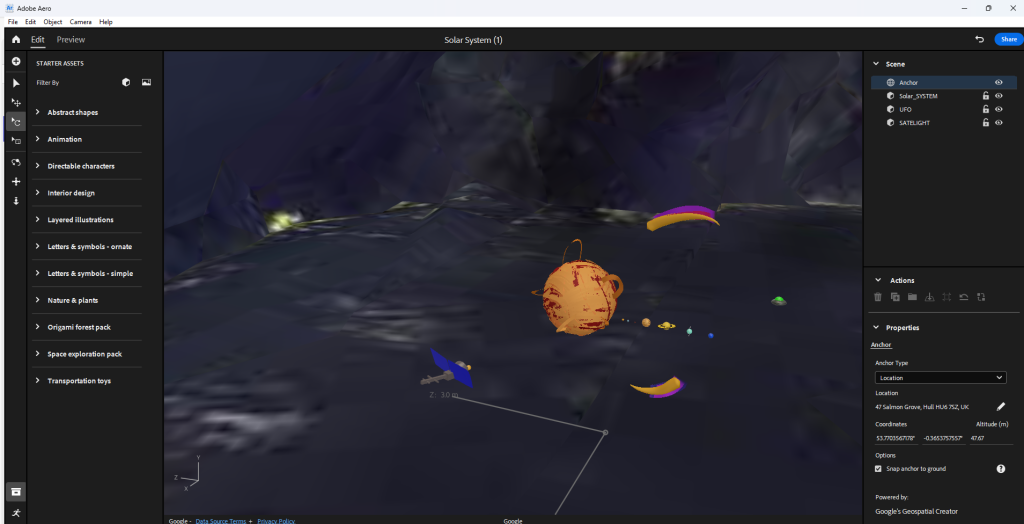
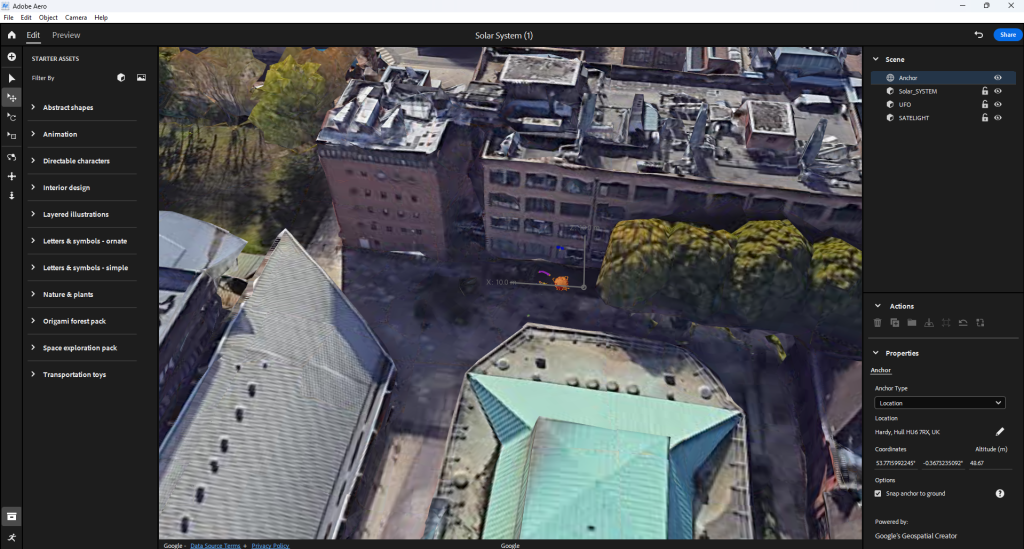
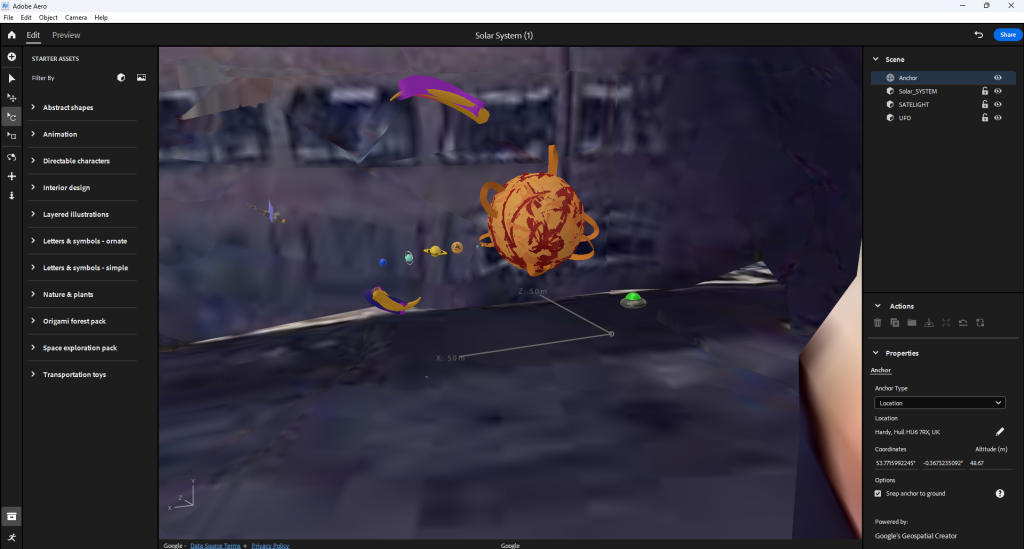
When creating the Adobe Aero file, I imported the three glb files of each of the VR art converted into models. I added the solar system model, the UFO model and the satellite model. AR art can be a bit inconsistent and can be difficult to get right. So going into this part of the project, I expected some trial and error when scanning the Q r-code given to me, going to the location and record the scene.

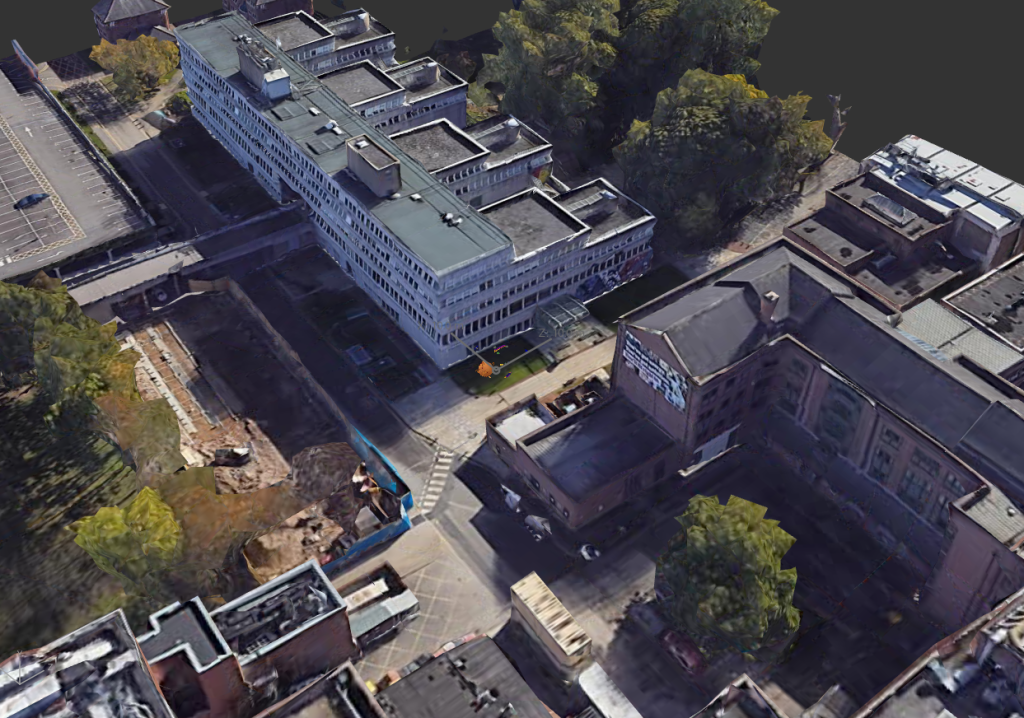
When implementing the models in Adobe Aero, I wanted the location of the models to be in a park area near where I work of course so I don’t need to run back to the computer I worked from as much when it fails. The park area is nice and not that busy. When I scanned the Q-code and went to that area, I had trouble scanning the area. I did this around five times and realised that the trees in the park area looked different to what’s in the AR software making it struggle to figure out where I am in the real world when I scan.

This lead to me changing the location of the models to an area that looks similar to the software. Also since the software is old, it would mean that I need to pick a location that’s been there at least more than 50 or 20 years.

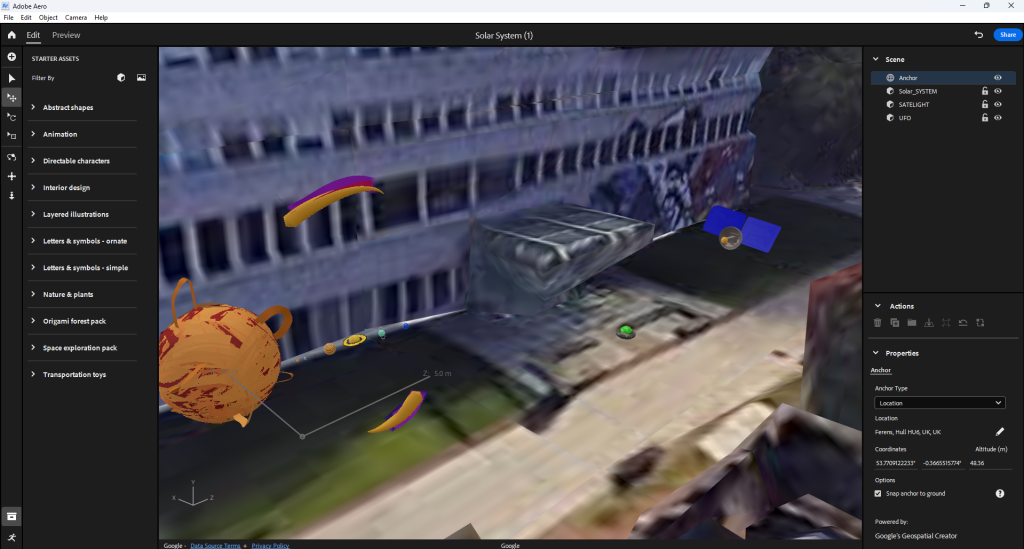
So I changed the location to a more recognisable area and placed the models near some buildings that has been built for more than 50 years. I then pressed the blue share feature button that allows the software to compile everything into a Q r-code. When I scanned the code and went to the location to pan around, the model refuses to load for some reason.

There could be a lot of factors to why this is the case. This includes; weather, satellite interference and some environmental factors that go from buildings being built or destroyed to tree leaves not being fully grown.

Thanks to previous experiences with AR, testing and experimenting, I do know of a place that works 100% of the time. I was also told maybe to separate the UFO the satellite and the solar system from each other and make the experience more immersive by creating a long line of artworks a far from each other.

When compiling the scene together and scanning the Q r-code, I went out to check if it’s working. Sometimes when I do check if the AR scan works, I get issues where the models are in a completely place. This is due to the software being buggy and the AR functionality being less advanced.

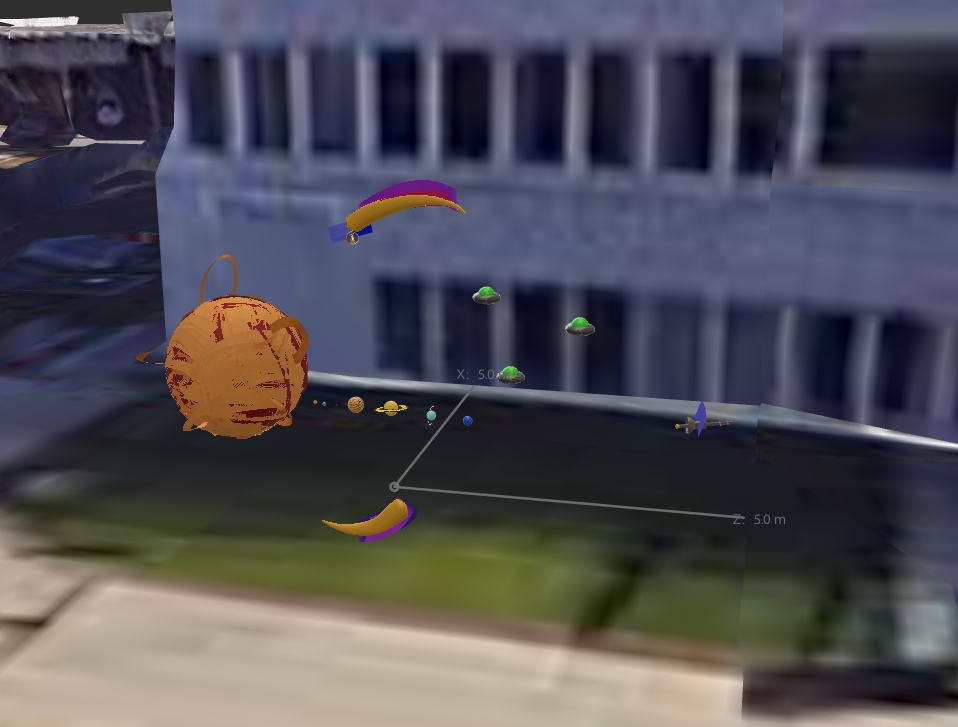
Further more, I learned that separating the models actually make it worse in terms of calibration. When I walk up to the first model and then walk to the second and then the third the whole AR experience flips and puts all of the models in a completely different area. So, what I did to fix the issue is put all the models together and record the whole thing.

Q r-code

(Just in case you want to see it but it’s only in that location and it’s difficult and a huge pain to experience it. I recommend you just watch the production video below)

Ethical Considerations

The user will be able to use Adobe Aero to scan a Q r-code and go to the specified location for the model to load. The user will be able to walk towards the model and circle around it. The Q r-code will be sent to me on Adobe Aero so it’s completely safe to use.

  • It being an AR experience makes it easier for the user to traverse the scene. They don’t need to travel too far making it safe for the user if in a safe environment.
  • Also the controls to scan the Q r-code and scan the area marked on the map is pretty intuitive and easy to understand once the set up is done and all the models are present.
  • Since it is an AR experience, motion sickness won’t be a factor to be concerned about due to the user is familiar to his or her surroundings
  • The light trail won’t be added to model as it dwarfs the solar system (or it makes the trail too big.

Forward thinking

Since the project is aimed to educate others and also children about our solar system. There are three models I have created for this AR project. One, is our solar system (this may inform others on what each of the planets look like, how many there are, where there at in relation to the sun and there individual sizes).

Second, is a lone alien space ship (even though the thought of the existence alien life may seem silly and weird to think about, but in reality we don’t know if there are extra terrestrial life living beyond our planet). Emphasising a sense of mystery within the immersive experience.

Third, is a highly advanced satellite (this may inform others that our technology continues to expand with new discoveries and revelations) who knows maybe we’ll get to a point where we find another habitable planet with new species or minerals to utilise for the betterment of human kind.

In terms of forward thinking, when I place the VR made models I created into the location I plan to set, I’m going to record the out come of the AR experience. When recoding, I’ll need to make sure that I’ll take my time with it so when narrating in post production, I won’t feel rushed to say a few things about each of the models I did for the project.

Production Video (Narrated)

Production video (Un-narrated)

Reference list

BreakingCopyright (2021) Epic Sci-Fi & Cinematic (Music for Videos) – ‘Ultra’ by Savfk. YouTube. Available online: https://www.youtube.com/watch?v=8-c4hT35BRg&list=PLfP6i5T0-DkKqBmz_qzJtZOmlbO7CHlVD [Accessed 11 Dec. 2024].

Charlotte (2018) Visual Arts: Definition, Elements, 2D Art vs. 3D Art, Filmmaking, Game Design. Abstract Art Paintings by Carmen Guedez. Available online: https://cgmodernart.com/art-articles/visual-arts-definition-types-elements-2d-art-vs-3d-art-filmmaking-game-design [Accessed 22 Nov. 2024].

Kart, M. (2023) Rainbow Road (Wii). Mario Kart Racing Wiki. Available online: https://mariokart.fandom.com/wiki/Rainbow_Road_(Wii) [Accessed 4 Dec. 2024].

Kozlowski, M. (2021) What is Immersive Art? | A guide to art terminology. avantarte.com. Available online: https://avantarte.com/glossary/immersive-art [Accessed 22 Nov. 2024].

marianagaro (2023) The Marvelous Benefits of Immersive Exhibitions – TrackIn. TrackIn. Available online: https://trackin.tech/the-marvelous-benefits-of-immersive-exhibitions/ [Accessed 23 Nov. 2024].

Categories
Lab Exercises Research proposal

Crafting Your Emerging Tech Project with the Research Project

Introduction

I have gained a lot of experience throughout the lab sessions. I have received and experimented with different software. Those lab sessions include 360 video making, MASH video making, using FrameVR, making AR experiences and experimenting with multiple different VR art software.

I have made my choice in what software I’m going to use for the future project I’m creating. When experimenting with the art software, I came across a software that really stuck out to me as a creative designer. It’s fun, intuitive and easy to learn through time.

The software is known as Open Brush. Open Brush lets you paint in 3D space with virtual reality. To unleash your creativity with three-dimensional brush strokes, choosing from a wide palette, of brushes, including stars, light, and even fire. Your room is your canvas. Your palette is your imagination. The possibilities are endless.

Two Ideas I had whilst brainstorming on the project

  • A Solar System VR experience (that teaches players about the different planets in our solar system)
  • A WebVR portfolio (that focusses on trash waste in polluted oceans)

Research Overview

I decided to go for a Solar System experience which means my research will consist of our solar system and almost everything about it. it will include the planets Sun, Mercury, Venus, Earth, Mars, Jupiter, Saturn, Uranus and Neptune, what they look like and where they’re at on the solar system. The experience itself would have small fact boxes, a visual or audio that will tell some planet facts to the user.

Also the planets will have proportionally correct sizes to each other and the looks of the planets needs to be true to what they are. This is another thing I needed to research on that aspect.

In terms of visuals, the user sees a light path that leads to the solar system that is floating on top of a pillar or table. I would need to test out if I can mask the table out when the user flies deeper into the solar system. This will also count as research in my project.

Ethical considerations (what does it aim for?)

  • The experience needs to be factual as our solar system is a real thing and it could teach the user some fun and light facts. Also since this is meant to be a fun experience, adding lots of factual writing and information can be boring for the user
  • Also having wrong information about the solar system is not a good thing to have when your teaching others about the solar system because it may break the immersion
  • The user at one point does need to use the fly function in Open Brush to fly into the solar system in order to see the planets close up. This can provide a more in depth view on what the planets look like and the user can look around it not being only tied to looking at it one way
  • The experience it self can be viewed in both flying and teleport so motion sickness can be reduced if the player uses the teleport feature. Since the teleport feature is an instant travel, you won’t feel much motion sickness because the brain isn’t receiving conflicting signals about movement in the environment around you
  • The user will be guided visually throughout the experience with the use of brush strokes or in my case stars or space dust to fit with the theme of the solar system level. In most game design, the light helps direct the player’s eye, highlight contrasts, and show key focal points. The place that a player should go as well as what awaits them there. The lighting also creates an atmosphere that evokes certain emotions and a “wow” effect.

Possible fear of hights

My experience of flying through the solar system could make the user have some induced fear of heights. When they look down they see the endless void below. This could be a problem for some users because it may make them not want to experience the idea of falling.

As flying in VR can give others motion sickness and or induce potential fear of hights within the experience, I have thought of a way to fix this issue. Having the user sit down on the floor or on a chair, can provide enough comfort and stability for the user.

Movement

In terms of movement the player will either use the fly function or teleport function in Open Brush and will be visually guided using colour or light. I found out that creating a visual or trail to guide the user can be just as successful in guiding a player or user to something than using text.

The user gets introduced to the many planets starting from the sun and ending on Neptune in a chronological order. The trail will also go from the start of the experience to the end of the experience.

Project scope and objectives

This project’s goal is to teach and show the user a greater understanding of our solar system and it’s many planets. It will be a light experience where the player can learn about the different planets and view them either from a distance or close up with a decent visual accuracy.

It may also create an awareness of other planets we are yet to explore and that our reality is currently orbiting into the endless void of space. It can also provide a nice way to teach children the solar system (possibly hinting to the user that their might be new undiscovered planets) experiencing the planets up close is a great way to teach others even at the comfort of their own home.

Also since VR headsets are available to everyone around the world, It can provide an immersive teaching experience.

Key Objectives

  • The user can fly/ teleport through, a solar system experience to teach the user of the planets I create
  • I want the user to gain an understanding of our solar system and immerse them into a fun experience
  • I want the user to be immersed whilst avoiding motion sickness. A way to counter motion sickness is for the player to choose from flight mode or teleport mode. And the project mainly being still and simple it won’t overwhelm the user
  • To create a fun immersive experience about the solar system whilst understanding the different tools used in Open Brush to help me create an experience

Research of Concept

In here, I will talk about the research I have made when thinking about this project. I will also include some research images and inspiration of my ideas. Mood boards will also be added into this research section.

With the Images I found, I want the experience to be whimsical in terms of visuals (as the user goes through the system and looks at the majestic planets close up) and I want it to remain factual by creating the orbit rings, maintaining correct size proportions of planets within the system and maintaining the correct colour palate for all of the planets.

Looking into user movement and limiting potential motion sickness, I decided to make it so that the planets are all ready aliened so the player/ user can move from one planet to the next (following a trail) without much need for extreme movement (going from one end of the system to the other if the planets are orbiting at there own pace).

For a factual standpoint, the user can learn about the planets with the visuals provided (where the planets are at within our solar system, how big they are in relative to each other (of course proportionally accurate sizes) and what do they look like. Some light text could be involved to teach the user more about each planet.

Or another idea would be that I would narrate the facts to the user during post production instead of just using text boxes.

I want the user to have a nice overall experience with the solar system by toning down the facts (so it won’t be too much for the user) and the visual style can be pretty basic but nice to look at (not to overstimulate the user with complex designs and structure).

I did however, consider adding Pluto as the 9th and final planet in the solar system experience but after researching on multiple sources online, I found many that say that Pluto is no longer a planet anymore due to it technically being a dwarf planet.

So with that research made, I decided not to add Pluto in the solar system and plan to make Neptune the final planet in the solar system. It did feel strange though because as a kid I’ve always learned that Pluto was the final planet and ending on Neptune feels weird.

Project Plan

My overall plan for this project is to create an experience where the player can explore our solar system with the use of a VR art software called Open Brush. The user get to see the Sun, Mercury, Venus, Earth, Mars, Jupiter, Saturn, Uranus and Neptune. This will include planets that will be proportionally correct in size to each other, the look of the planets needs to be similar to what most facts and sources state otherwise It may brake the immersion of the experience.

I will also add the orbit rings around the sun so I can place the planets on those rings. Even though the rings aren’t present in our solar system, I wanted to add them for a few reasons; to allow me to figure out and measure where and how far the planets needs to be from each other (also in relation to the sun) and to link back to almost every illustration about the solar system in existence having the orbits in my experience can remind the user that this experience is to teach them the basics of our solar system.

Another way immersion could break in my VR experience is that the user my stray from the path I lead it in my experience. This a lot harder to fix from a functional aspect, but If I created a path this may avoid the user from straying from the path. I have a few ideas to avoid this from happening.

  • Make the trail look visually attractive by adding some noticeable light effects and nice smooth colours
  • Beyond the solar system will be an endless black void (having that, may make the user hesitate to wonder aimlessly into the void)
  • Make each planet feel good to look at by adding effects, light sources or have attractive colours (whilst maintaining accuracy)

The experience will help the user passively learn more about our solar system. So by creating this experience, it will guarantee not only a fun experience for the user (letting the user see the accurate planets I create and the VR functions allowing the person fly around the planets) but also learn more about the planets first hand by seeing what they look like and their size difference.

The user starts off in a dark void and theirs only a singular light path that leads you to a small solar system that the player can fly into and experience it in full size (if they want). This basically makes the user feel like a god as they fly or teleport through the solar system. As the player/ user explores and feels lost they can always follow the light dust stream floating in space.

They start off with the sun, seeing a boiling hot ball of magma and work there way through Mercury a planet that looks grey, Venus a very hot planet despite being further from the sun, Earth being habitable of life, Mars being red due to being covered in iron oxide dust, Jupiter being a gas giant and having a large diameter being eleven times the amount that earth has, Saturn being intangible and it’s rings aren’t solid, Uranus being made of mostly water, ice, methane, ammonia and a small rocky core in the middle, and Neptune’s tone of colour is slightly different (Neptune being a darker blue colour compared to Uranus being a cyan colour, it is also made up with water, ice, methane, ammonia).

Post Production

For the assignment, I need to record and post a video link of the experience in a production blog post. The software (that I will be using to make the video) is Premier Pro. Here I will edit the video and with the help of OBS (a general recording software) I can also record and implement my sound into the video. I might be adding a constant relaxing music and a voiceover talking about the facts of each of the planets. After that I’ll post my video on YouTube.

Concept Storyboard

I created a rough storyboard for the VR experience that shows everything from start to finish. The software I used to create this story board was Photoshop. It is the preferred software I can use to create basic mock ups of my idea.

I also colour coordinated some key parts of the storyboard for example, movement (the purple arrows shows where the user goes and what they will experience when they follow the arrow or in their case a trail of some sorts to each segment of the experience chronologically) key objects are coloured red, (to signify importance) black to show certain camera controls (how I perceive the experience should go) and all of the planets drawn are coloured to their respective looks to create a difference within each of the storyboard segments (if the planets where monochromatic in colour, they can look pretty boring as the scenes look similar to each other throughout the storyboard.

When creating the storyboards, I used a new technique to create a sense of depth within a storyboard (even though storyboards are meant to be used for video and picture style forms of media and entertainment). That technique was to have the box surround the scene, not apply in some certain scenes of the storyboard. Those scenes include how the user passes a planet to go to the next planet. Having an object or scene exit the box adds some depth into the storyboard and naturally feels strange because that’s not how usual story boards work.

But for a VR experience, It can work that way and can give others a better understanding of how the experience should go. The storyboard Starts from top left and ends at the bottom right where it says “The End”.

Creating this story board gave me a better understanding of what my experience should look like and also helped me to realise what I needed to do VR art wise. Those Include what planets to create, (Mercury, Venus, Earth, Mars, Jupiter, Saturn, Uranus and Neptune) how big the experience is (walking up to the mini solar system and flying into the experience and seeing the planets up close in their proportionally accurate size) and an overall fluent rundown of the entire project. It also made me realise how simple and straight forward my experience may seem.

Production Timeline (Excel)

This is my very rough production timeline of tasks I needed to finish before the deadline. At first I struggled in creating this because I always think too literal when doing something like this where I wonder If I can do these tasks in the time or not and ending up being concerned for the future.

But I realised when I finished this timeline in Excel, I felt I gained a better understanding of how I will complete the VR experience and knowing that I have technically 3 months to complete it and thought about each of my tasks, I felt a little more confident in my self to finish those tasks.

Those tasks include the blog post itself, the first scene (where the user starts), planet progress, text work progress, feedback, recording of experience, post recording on YouTube and send the portfolio blog production post.

References

Websites

Brush, O. (2020) Open Brush. openbrush.app. Available online: https://openbrush.app/ [Accessed 29 Oct. 2024].

NASA (2023a) Neptune – NASA Science. science.nasa.gov. Available online: https://science.nasa.gov/neptune/ [Accessed 29 Oct. 2024].

NASA (2023b) Venus – NASA Science. science.nasa.gov. Available online: https://science.nasa.gov/venus/ [Accessed 29 Oct. 2024].

NASA (2024a) Facts About Earth – NASA Science. science.nasa.gov. Available online: https://science.nasa.gov/earth/facts/ [Accessed 29 Oct. 2024].

NASA (2024b) Mars – NASA Science. science.nasa.gov. Available online: https://science.nasa.gov/mars/ [Accessed 29 Oct. 2024].

NASA (2024c) Mercury – NASA Science. science.nasa.gov. Available online: https://science.nasa.gov/mercury/ [Accessed 29 Oct. 2024].

NASA (2024d) Saturn – NASA Science. science.nasa.gov. Available online: https://science.nasa.gov/saturn/ [Accessed 29 Oct. 2024].

NASA (2024e) Uranus – NASA Science. science.nasa.gov. Available online: https://science.nasa.gov/uranus/ [Accessed 29 Oct. 2024].

Nasa, N. (2024) Jupiter – NASA Science. science.nasa.gov. Available online: https://science.nasa.gov/jupiter/ [Accessed 29 Oct. 2024].

Thompson, S. (2020) Motion Sickness in VR: Why it happens and how to minimise it. virtualspeech.com. Available online: https://virtualspeech.com/blog/motion-sickness-vr [Accessed 29 Oct. 2024].

Universe, W.R. (2024) Using light and color in game development: a beginner’s guide. MY.GAMES. Available online: https://medium.com/my-games-company/using-light-and-color-in-game-development-a-beginners-guide-400edf4a7ae0 [Accessed 29 Oct. 2024].

Images

Ashwin (2015) Why Is Pluto Not A Planet Anymore? Science ABC. Available online: https://www.scienceabc.com/nature/universe/journey-of-pluto-why-it-lost-its-status-as-a-planet.html [Accessed 29 Oct. 2024].

Bartlett, R. (2022) 8 Things You Need to Know About the 8 Planets in Our Solar System | High Point Scientific. www.highpointscientific.com. Available online: https://www.highpointscientific.com/astronomy-hub/post/astronomy-101/8-things-you-need-to-know-about-the-8-planets-in-our-solar-system [Accessed 29 Oct. 2024].

BBC Bitesize (2022) Features of our solar system guide for KS3 physics students – BBC Bitesize. BBC Bitesize. Available online: https://www.bbc.co.uk/bitesize/articles/zxyw7yc#zd6g8p3 [Accessed 29 Oct. 2024].

FunKids (2016) Top 10 Facts about The Solar System. Fun Kids – the UK’s children’s radio station. Available online: https://www.funkidslive.com/learn/top-10-facts/top-10-facts-about-the-solar-system/ [Accessed 29 Oct. 2024].

Games, P. (2021) Solar Smash. Google.com. Available online: https://play.google.com/store/apps/details?id=com.paradyme.solarsmash&hl=en_GB&pli=1 [Accessed 29 Oct. 2024].

NASA (2024) Planets – NASA Science. science.nasa.gov. Available online: https://science.nasa.gov/solar-system/planets/ [Accessed 29 Oct. 2024].

Plait, P. (2017) Scaling the solar system. SYFY Official Site. Available online: https://www.syfy.com/syfy-wire/scaling-the-solar-system [Accessed 29 Oct. 2024].

Robert Roy Britt (2017) Solar System Planets: Order of the 8 (or 9) Planets. Space.com. Available online: https://www.space.com/16080-solar-system-planets.html [Accessed 29 Oct. 2024].

Vanstone, E. (2022) How big is the Solar System? Science Experiments for Kids. Available online: https://www.science-sparks.com/how-big-is-the-solar-system/ [Accessed 29 Oct. 2024].

Categories
Lab Exercises Research proposal

Creating VR Immersive Art Using multiple experiences.

Introduction

I was given a task complete. This task was to experience 4 different types VR Art software. After I have done with the experience, my next goal is to document it and add a segment that will include my thoughts; How I relate with these activities, if I want to carry those experiences on for my future.

What I did this week (VR, AR, MR, XR)

I have gained experience and a better understanding of multiple different VR art software. I had a really fun time testing and playing around with the different functions and capabilities. Although I did have some trouble with understanding the ways to create art (some of the functionality was a bit confusing) and in some cases feeling slightly dizzy and disorientated when wearing the headset and also taking off the headset.

What is VR?

Virtual reality, or VR, is a simulated three-dimensional (3D) environment that lets users explore and interact with a virtual surrounding in a way that approximates reality, as it’s perceived through the users’ senses.

The environment is created with computer hardware and software, although users might also need to wear devices such as goggles, headsets or bodysuits to interact with the environment.

Advantages

  • Immersive Learning: VR provides an immersive and realistic learning experience, allowing users to interact with virtual environments and objects as if they were real.
  • Safe Training Environment: VR enables trainees to practice dangerous or high-risk scenarios in a safe environment, reducing the risk of injury and equipment damage.
  • Repeatable Scenarios: Trainees can repeat VR scenarios as often as needed to refine skills and build muscle memory, ensuring consistent and thorough training outcomes.
  • Customizable Simulations: VR allows training scenarios to be tailored to specific learning objectives and challenges, enabling personalized and targeted skill development.
  • Data Collection and Assessment: VR systems can collect detailed performance data, enabling trainers to assess trainee progress, identify strengths and weaknesses, and adapt training accordingly.

Disadvantages

  • Motion Sickness: Some users may experience motion sickness or discomfort due to the sensory disconnect between virtual and physical movements, leading to nausea and dizziness.
  • Cost and Accessibility: VR systems can be expensive to develop and maintain, making them less accessible to organizations with limited budgets. High-quality hardware and software requirements can also pose barriers to adoption.
  • Ethical Concerns: The immersive nature of VR can desensitize users to violence and blur the line between reality and simulation, raising ethical concerns about its impact on perception and behaviour.
  • Learning Curve: Some users may struggle with the learning curve associated with using VR equipment and navigating virtual environments, potentially affecting the efficiency of training programs.
  • Isolation and Social Disconnect: Prolonged use of VR can lead to isolation from the real world and reduced face-to-face interaction, potentially impacting social skills and relationships.

What is MR?

MR brings together real world and digital elements. In mixed reality, you interact with and manipulate both physical and virtual items and environments, using next-generation sensing and imaging technologies. Mixed Reality allows you to see and immerse yourself in the world around you even as you interact with a virtual environment using your own hands all without ever removing your headset.

It provides the ability to have one foot (or hand) in the real world, and the other in an imaginary place, breaking down basic concepts between the real and the imaginary, offering an experience that can change the way you game and work today.

Advantages

  • Gaming: Mixed reality is being used to create highly immersive gaming experiences that allow players to interact with digital objects in a realistic and intuitive way. For example, Microsoft’s HoloLens headset allows players to build and manipulate virtual structures using hand gestures and voice commands.
  • Education: Mixed reality is being used to create interactive educational experiences that allow students to explore complex concepts in a more intuitive way. For example, medical students can use mixed reality to simulate surgical procedures and gain hands-on experience before performing them in real life.
  • Healthcare: Mixed reality is being used to create more efficient and effective healthcare experiences. For example, doctors can use mixed reality to visualize medical data in real-time, allowing them to make more accurate diagnoses and treatment decisions.
  • Manufacturing: Mixed reality is being used to improve the manufacturing process by allowing engineers to visualize and manipulate 3D models in real-time. This can help to reduce errors and improve efficiency, leading to faster and more cost-effective production.
  • Immersive experience: Mixed reality creates a highly immersive experience that allows users to interact with digital objects in a more natural and intuitive way.
  • Real-time interaction: Mixed reality allows for real-time interaction between digital and physical objects, creating a seamless blend of the virtual and physical worlds.
  • Hands-free operation: Mixed reality headsets allow for hands-free operation, which can be especially useful in situations where users need to keep their hands free for other tasks.
  • Increased efficiency: Mixed reality can improve efficiency by providing users with real-time access to information and data, allowing them to make faster and more accurate decisions.
  • Cost-effective: Mixed reality technology is becoming more affordable and accessible, making it a cost-effective solution for a wide range of applications.

Disadvantages

  • Technical limitations: Mixed reality technology is still relatively new, and there are still technical limitations that need to be addressed, such as limited field of view and processing power.
  • User acceptance: Mixed reality technology may not be widely accepted by all users, as some may find the experience disorienting or uncomfortable.
  • Privacy and security: Mixed reality technology raises new privacy and security concerns, as it can potentially capture and transmit personal data and information.
  • Cost: While mixed reality technology is becoming more affordable, it can still be expensive, especially for high-end applications.

What is XR?

XR is an emerging umbrella term for all the immersive technologies. Those include, augmented reality (AR), virtual reality (VR), and mixed reality (MR) plus those that are still to be created. All immersive technologies extend the reality we experience by either blending the virtual and “real” worlds or by creating a fully immersive experience

Advantages

  • Retail: XR gives customers the ability to try before they buy. Watch manufacturer Rolex has an AR app that allows you to try on watches on your actual wrist, and furniture company IKEA gives customers the ability to place furniture items into their home via their smartphone.
  • Training: Especially in life-and-death circumstances, XR can provide training tools that are hyper-realistic that will help soldiers, healthcare professionals, pilots/astronauts, chemists, and more figure out solutions to problems or learn how to respond to dangerous circumstances without putting their lives or anyone else’s at risk.
  • Remote work: Workers can connect to the home office or with professionals located around the world in a way that makes both sides feel like they are in the same room.
  • Marketing: The possibilities to engage with prospective customers and consumers through XR will have marketing professionals pondering all the potential of using XR to their company’s advantage.
  • Real estate: Finding buyers or tenants might be easier if individuals can “walk through” spaces to decide if they want it even when they are in some other location.
  • Entertainment: As an early adopter, the entertainment industry will continue to find new ways of utilizing immersive technologies.

Disadvantages

  • Those developing XR technologies are battling with some of the challenges to mainstream adoption.
  • First, XR technologies collect and process huge amounts of very detailed and personal data about what you do, what you look at, and even your emotions at any given time, which has to be protected.
  • In addition, the cost of implementing the technology needs to come down; otherwise, many companies will be unable to invest in it. It is essential that the wearable devices that allow a full XR experience are fashionable and comfortable as well as always connected, intelligent, and immersive.
  • There are significant technical and hardware issues to solve that include but are not limited to the display, power and thermal, motion tracking, connectivity and common illumination where virtual objects in a real world are indistinguishable from real objects especially as lighting shifts.

Adobe Aero

When experimenting with Adobe Aero, I found it incredibly easy and intuitive to learn. Basically, open the software, put the location you want in the software and place already made models within the specific scene you want, turn it into an AR experience from technically anywhere after I scan a Q r-code.

Process

Q r-code

Outcome

Do I plan to use this software again in the future?

No. Out of all the software I’ve experienced, this software was the most basic and probably has the least artistic/ immersive need for experience. It’s practically find location, place object in said location turn it into a Qr-code to scan and go to that location and pan around to make it work.

Advantages

  • Extremely easy to do
  • Can be used to present an art piece in any location

Disadvantages

  • Too basic (not much one can do with AR)
  • Can be pretty lacklustre in my opinion.

Gravity Sketch

When experimenting with Gravity Sketch, I was creating basic shapes, drawing lines, and using different colours. I was learning multiple different functions like moving the entire scene, rotating it, expanding or shrinking it and etc. As it is my first time using it, I did struggle with achieving certain goals like if I only wanted to move a singular object I placed, ending up in moving the entire scene at once for example. But I did have a lot of fun with the software. Me and another student recorded our experiences.

Experimental Videos

Video Made By Ben Corcoran
Video Made By Myself

Do I plan to use this software again in the future?

No. When exploring Gravity Sketch, I realised it mainly centred around creating basic shapes and drawing. All of this was a fun experience but I did find it a bit basic in terms of what I can do. Also I had some struggles when it comes to moving separate objects and doing other certain features. This is probably due to me not being experienced with the VR software.

Advantages

  • It was fun and some of the controls where easy to understand
  • Allowed me to create basic shapes, lines and more with any colour I wished
  • Once I knew about and learned the controls of the software it became more easier to use

Disadvantages

  • Other controls where a bit finicky and hard to use and can be a bit frustrating when using it
  • Felt that the things I can do are a bit basic and boring
  • Didn’t think I understood most of the things I can do on the software and felt that I missed out on learning it

Shape XR

When experimenting with Shape XR, I was implementing basic assets like furniture, vehicles, food and mannequin body poses. I was learning multiple different functions like moving objects, rotating it, expanding or shrinking it and etc. Me an another person had the chance to explore with the features of the software.

As it is my first time using it, I struggled a lot with with the software. I added a simple burger model into the scene but I did not like the where I placed it. So I tried moving the burger but instead managed to duplicate the burger and the entire scene I was in and moved it creating a very warped and destroyed area. I felt that the controls where finicky and weird as I struggled achieving the simplest of functions.

Experimental Videos

Video Made By Ben Corcoran
Video Made By Myself

Do I plan to use this software again in the future?

No. I felt that the controls where hard and annoying to use. Also the type of work needed to do doesn’t fit with what I wanted to do art wise. From the experience, the goal goal was to grab basic assets and place them into the scene. Whilst trying to understand the basics of the software, I ended up completely ruining it in the worst possible way.

Advantages

  • Allows for more scenery building
  • Can become more intuitive as time passes with learning the basic controls
  • Visually the controls seem easy to understand and the experience looks high quality.

Disadvantages

  • Only limited to scenery building
  • Controls can be hard and annoying to use for first time users
  • The overall view of the scenery and what you can do is very basic as it is just dragging assets from a folder and dropping it into the scene
  • It was so easy to mess up the scenery your working on

Open Brush

When experimenting with Open Brush, It was honestly the better VR application out of all the software I’ve used. It was the most intuitive and easy to understand software. Me an another person had the chance to explore with the features of the software.

I learned how to create brush strokes and create 3D objects with those strokes. My partner created a little forest like scene with campfire and a night sky. I created a log next to the fire and a brown bear sitting on that log and singing. It was very fun.

Experimental Videos

Video Made By Ben Corcoran
Video Made By Myself

Do I plan to use this software again in the future?

Yes. I really enjoyed experiencing with this VR software. I felt that I intuitively learned most of the core design mechanics of Open Brush and felt that it brought out the creative drawing artist in me. I loved how simple the functionality and straight forward the controls are. It made me explore with new ways to create 3D art with that sense of familiarity (drawing).

Advantages

  • Felt that the controls where intuitive and easy to understand after practise
  • Relates to what I like doing as a hobby (drawing)
  • It has a wide range of things I can explore when creating art on the website
  • Allows me to have total control on where I place my art with the use of the fly feature it has.

Disadvantages

  • The fact that is in VR and I suffer from dizziness when I use the headset after long use
  • Also some of the controls are a bit confusing to get used to

Which software will I be using more?

I will definitely be using Open Brush more if I had the chance.

References

Websites

Intel (2019) Virtual Reality Vs. Augmented Reality Vs. Mixed Reality – Intel. Intel. Available online: https://www.intel.com/content/www/us/en/tech-tips-and-tricks/virtual-reality-vs-augmented-reality.html [Accessed 25 Oct. 2024].

Isfahani, S. (2023) Exploring the Future of Interaction: The Advantages and Applications of Mixed Reality. www.linkedin.com. Available online: https://www.linkedin.com/pulse/exploring-future-interaction-advantages-applications-mixed-isfahani [Accessed 25 Oct. 2024].

Marr, B. (2019) What Is Extended Reality Technology? A Simple Explanation For Anyone. Forbes. Available online: https://www.forbes.com/sites/bernardmarr/2019/08/12/what-is-extended-reality-technology-a-simple-explanation-for-anyone/ [Accessed 25 Oct. 2024].

Sheldon, R. (2022) What is Virtual Reality? Tech Target. Available online: https://www.techtarget.com/whatis/definition/virtual-reality [Accessed 25 Oct. 2024].

Simbott (2023) 11 Virtual Reality Advantages And Disadvantages (2023). Simbott. Available online: https://simbott.com/virtual-reality-advantages-and-disadvantages/ [Accessed 25 Oct. 2024].

yigitbaba (2023) Disadvantages of Mixed Reality. capsulesight.com. Available online: https://capsulesight.com/mixedreality/disadvantages-of-mixed-reality/ [Accessed 25 Oct. 2024].

Categories
Lab Exercises Research proposal

Creating an Immersive User Experience Using AR and use of the Zapworks website.

Introduction

During week 3, I was given another task to complete. This task is to create an AR experience that I can scan with my phone and use a trigger image to show in front of you. After I have done with that task my next goal is to document it and add a segment that will include my thoughts on how I relate with this activity, if I want to carry this experience on for my future.

What Is AR?

Augmented reality (AR) is an enhanced version of the real world, achieved through the use of computer-generated digital information. These include visual, sound, and other sensory elements. AR uses computer hardware and software, such as apps, consoles, screens, or projections, to combine digital information with the real-world environment.

Pros and Cons of AR

Advantages

  • It helps with the learning process: provides an easy view rather than reading guidelines and can engage the user more.
  • Creates unique user experiences: AR helps to create unique digital experiences that help in blending digital and physical worlds. Ar helps the user to experience immersive experiences through browsers. AR blend audio-visual experiences with realities. It helps to place digital elements on top of physical elements to create a mirage effect.
  • Removes cognitive overload: Cognitive overload happens when a machine’s working memory is made to process huge information sources. Cognitive overload hampers the work process and decision-making. Ar helps to present the information in a summarized orderly manner. AR also helps to process the information and develop results accordingly.
  • Creates user engagement: AR helps businesses to improve user engagement. AR helps to make better visibility of product labels and aids to create interactive ads and catalogues. AR when combined with other technology enhances the ability to deliver information faster.

Disadvantages

  • The cost of AR implementation is high: To create an AR experience can be costly due to the process and making it fully functional for everyone is required for that experience
  • Most devices having a low level of performance house low AR compatibility: Not everyone can experience AR due to the performance of their devices.
  • AR can lead to a security breach and lack of user privacy: AR hackers can embed malicious content into applications via advertising. Unsuspecting users may click on ads that lead to hostage websites or malware infected AR servers that house unreliable visuals undermining AR security.

AR testing and exploration

I followed some tutorials given to me to create an AR experience and I used Unity as the main software. After going through installing the Zappar package, (that allows me to create the AR experience and put it on the Zapworks website) I did some camera related work.

I then downloaded the tutorial file and inside was an image and a model. I used the inspector to do some tweaks with the Activate the game object function and went to update to publish. After that I then went through the prosses of building the scene and post the file I have on the Zapworks website. At first, I found the guidance a little confusing but I understood it when I did it twice (animated and non animated).

AR test tutorial

First AR Project

Trigger Image

Animated Version

My First AR Animated Scan

Trigger Image

Custom AR mini project

My next goal within this part of the course is to create my own version of the AR experience with the knowledge I gained from the tutorial tasks. I decided to use a character model I created a while ago as the object that pops out when you scan the Q r-code and put the phone camera in front of a trigger image.

When using my model, it did not apply the textures I had on the character so what I did was applied colours to certain parts of my character to look better. I followed the exact same steps as above and posted the outcome on Zapworks.

My own AR mini project

Character AR Scan

Trigger Image

Do I plan to use this principle again for my Final Project?

No. In this project, I used Unity to create a working AR experience that with my phone, I can scan a Q r-code to access the website and use the trigger image on the thumbnail of the project (this means that the anyone who can scan the code doesn’t need to find the trigger image since it’s already in front of them).

I did enjoy doing this project even though the whole process was confusing and slightly complicated, the outcome I got was fairly decent for my first time. I liked how I managed to create an AR experience where one of my art pieces gets shown in a special way.

Advantages

  • I managed to be successful in the lab session and have created a working AR experience
  • I understand more about Unity in the AR side of things
  • I learned something new in creating an AR experience
  • I did like the tutorials I was given to be able to do stuff like AR.
  • The object that pops out is clear and easy to see.

Disadvantages

  • Some parts of the project was difficult to understand for example the guidance we where given was complex.
  • The outcome of the AR could look weird due to the camera being used
  • The object being projected must be the right size to have it fit a general computer screen
  • Also the distance of the object to the trigger picture matters a lot if you want a clear outcome to avoid rendering issues.

Reference list

Websites

Apurvawagh (2022) What Are The Advantages And Disadvantages Of AR? Medium. Available online: https://medium.com/@apurvawagh/what-are-the-advantages-and-disadvantages-of-ar-c09c97f9d6 [Accessed 22 Oct. 2024].

Hayes, A. (2023) Augmented Reality (AR) Defined, with Examples and Uses. Investopedia. Available online: https://www.investopedia.com/terms/a/augmented-reality.asp [Accessed 22 Oct. 2024].

Kaspersky (2021) What are the Security and Privacy Risks of VR and AR. www.kaspersky.com. Available online: https://www.kaspersky.com/resource-center/threats/security-and-privacy-risks-of-ar-and-vr [Accessed 23 Oct. 2024].

Categories
Lab Exercises Research proposal

Prototyping An Immersive Experience using 360, 3D content and WebVR.

Introduction

I was given three lab related work segments to complete. Those include a 360 interactive video, a MASH prototype and an interactive portfolio. After I have done with those tasks my next goal is to document it and add a segment that will include my thoughts; How I relate with these activities, if I want to carry those experiences on for my future.

What is VR?

Virtual reality, or VR, is a simulated three-dimensional (3D) environment that lets users explore and interact with a virtual surrounding in a way that approximates reality, as it’s perceived through the users’ senses. The environment is created with computer hardware and software, although users might also need to wear devices such as goggles, headsets or bodysuits to interact with the environment.

The more deeply users can immerse themselves in a VR environment, and block out their physical surroundings, the more they can suspend their belief and accept it as real, even if it’s fantastical in nature.

Pros and Cons of VR

Pros of VR

  • Technology – Improves slowly by time.
  • Availability – VR headsets can be purchased all around the world and can be viewed from anywhere.
  • Multiple uses – Although primarily used for gaming, it can be used for training, marketing and advertising.
  • Engagement – The fact that the user can explore for themselves makes for a more memorable and enjoyable experience.
  • Experience – Allows people to “travel” to places that they may not get the chance to in real life. A dream holiday, for example.

Cons of VR

  • Technology – Still in the early stages of VR, there are some bugs that are to be worked on such as glitches.
  • Expensive – A VR experience needs a VR headset which are generally expensive.
  • Advertising – They need to be very well made to work properly, or els the audience will have a negative experience.
  • Real-life engagement – The users are cut off from the real world as their eyes are diverted to the world they see before them. This could become a problem if users use the headset too much as it would mean that there would be no more real-life engagement between people and families.
  • Experience – In testing, some people had experienced motion sickness when wearing the VR headset. This is something that developers are reportedly working on.

What is a 360 Video?

360 Video is content that has been recorded/rendered at all angles. This allows the User to watch from any angle of their choosing. Since the 360 Video’s shot with using a stereoscopic technique, this helps give a sense of depth to the scene.

Advantages

  • Immersive experience – a 360 view of the scene allows the user to feel that they have become apart of the virtual world. The user can look in any direction they wished.

Disadvantages

  • Lack of focus – Since the video was made from rendering on a 360 view, the camera can sometimes lack focus and make the scene blurry or distorted for the user.

360 Prototyping

For the 360 video, I used Photoshop to create a basic shot scene.

Using Maya and some tutorials, I simulated an alien ship flying in a city scape. I made the ship move and rendered the scene for a 360 video.

360 Video

MASH Prototyping

I was then given a task to produce a MASH sequence where it allows me to create procedural animations. Following tutorials, I manged to simulate an explosion where the debris splits into multiple pieces, turn different colours, rotate at random locations and falls to the ground. I was having some fun with the animation.

MAYA Version

After making the MASH simulation work, I then rendered it with the Arnold renderer, and immediately a few things did not go well.

  • Arnold did not apply the colours I wanted for the explosion making it annoyingly monochromatic hence the Maya version of the MASH video above.
  • After rendering, Premier Pro cuts out the entirety of the bottom half of the video. What I did to fix this issue is to sacrifice the top and move the video up in the viewport and when exporting the video should look like as if it’s in the middle of the screen.

I exported the video render of the MASH mini project and overall it looked ok. There was somethings that need improving but since it’s my first time and I was merely exploring with Maya’s cool features, I felt that I did have some fun with it.

Finalised MASH Video

Do I plan to use this principle again for my Final Project?

Since I had used Maya over the course of my university years, It is a good chance I will use it again. I know quite a lot of tools Maya has to offer and I’ve had decent experience.

Advantages:

  • I’ve had lots of practice
  • I know the basic tools used in the software
  • I know the basics of animation and camera movement

Disadvantages:

  • Never created an environment in Maya before
  • Rendering can be weird and fuzzy leading to severe quality drops.
  • Maya as a general 3D modelling software can be a difficult software to understand as it does have many bugs and software related issues

What is WebVR?

WebVR is a website that enables developers to create and control virtual reality (VR) experiences in the web browser.

Advantages:

  • Compatibility – All operating systems can use WebVR from windows to Mac. All devices can use WebVR from PC to mobile.
  • Pre-sets – There is a lot of saved sceneries and settings your art can be placed in. Grants variety to anyone using the website.

Disadvantages:

  • Can be Limiting – If you have a lot of work to show off, WebVR has a set limit of assets that can be placed into a world. This can force a person to have multiple portfolio worlds to show off their art.
  • Limited person count – Only up to 8 people can visit your world at a time. If you want to show off your project to a wider group, WebVR is going to be difficult.

VR Interactive Portfolio (WebVR)

During Week 2, I was given a really exciting task of creating my own virtual portfolio of all my best work that I’ve done in the past whither it be university work or my own. As I got introduced into WebVR, I had a choice of different sceneries so I could put my art in them. I chose a classic museum scene for my art.

I added so much art in the virtual portfolio, it practically became full once I have finished placing all my best art I’ve done over the years.

Drawings

Pokémon Related Art

Videos

Models

Interactive Experiences

Do I plan to use this website again for my Final Project?

Maybe. Using this website for the first time made me realise that I really enjoyed experiencing this website. It made me remember why I like doing art and drawings, loving the feeling of my skill being recognised and put on museum like scene. Which also makes me even more proud of my artworks.

Advantages:

  • I had a fun time experiencing with this website
  • Made me look back at my art and felt an overwhelming sense of accomplishment.
  • I have quickly learned the basics of the website
  • Like the idea of an interactive portfolio as a general (seeing other people’s portfolios makes me more inspired)
  • Loved receiving praise for the art and the way I presented it.

Disadvantages:

  • Limitations to what art I can show in terms of the asset size
  • Other people have different tastes when it comes to art
  • The fact that only 8 people can view your work at a time is disappointing when wanting show the portfolio to a wider audience

Which Software will I consider Using more?

I will defiantly use the WebVR interactive portfolio maker more for my future not necessarily for the final project.

References

Websites

Dadson, C. (2023) What is Web VR? Virtual Reality directly from the browser. Design4Real. Available online: https://design4real.de/en/what-is-web-vr/ [Accessed 22 Oct. 2024].

GCF Global (2020) The Now: What is 360 Video? GCFGlobal.org. Available online: https://edu.gcfglobal.org/en/thenow/what-is-360-video/1/ [Accessed 22 Oct. 2024].

Sheldon, R. (2022) What is Virtual Reality? Tech Target. Available online: https://www.techtarget.com/whatis/definition/virtual-reality [Accessed 22 Oct. 2024].

thompson, alex (2016) Virtual Reality vs 360 Video | Pros and Cons | Blog | AMA. A Marketing Agency | Digital Marketing Leeds. Available online: https://weareama.com/virtual-reality-vs-360-video/ [Accessed 22 Oct. 2024].